Tuesday, April 12, 2016

Zucchini Boats

I love zucchini, so I'm always trying to come up with different ways to fix it.  This recipe is pretty amazing with the buttery goodness of the bread crumbs and melted cheese, what's not to like.  If you would like a heartier version, you can add some breakfast sausage or bacon to it.  Delicious either way.  By the way, this one is about blunder proof (unless your burn it).  Makes for a win in my book.  Hope you like it too!   

ZUCCHINI BOATS

Ingredients
4 medium zucchini, cut in half lengthwise
1 Tablespoon olive oil or vegetable oil
1 Tablespoon melted butter
1 clove garlic, minced
1 small onion, diced
1 medium vine-ripened tomato diced
1/2 cup grated Parmesan cheese
1/2 cup shredded mozzarella
1/4 cup breadcrumbs (to make your own, lightly toast 2 end pieces of bread, tear into smaller pieces and place in small food processor, pulse 3-4 times until bread is crumbly but not into powder).
Salt and pepper to taste
2 Tablespoons chopped fresh parsley (optional)
*OPTIONAL - If you want to, you can add 8 oz of cooked and crumbled breakfast sausage or 6 strips of cooked bacon, chopped.  Add the meat to the mixture in bowl and mix well, then spoon into zucchini boats.  Bake as directed.

Directions
  1. Preheat the oven to 400 degrees F.
  2.  With a teaspoon, scoop out the flesh from the interior of the zucchini, making a boat shape. Chop the zucchini flesh and set aside.
  3. Place the zucchini boats on an aluminum foil lined pan sprayed with non-stick cooking spray.
  4.  In a medium sauté pan over medium heat, add the olive oil or vegetable oil and let heat through. Add the garlic, onion, chopped zucchini flesh, tomatoes and some salt and pepper. Cook until softened, about 4-5 minutes.
  5.  In a medium bowl, add the Parmesan, mozzarella, breadcrumbs and parsley; mix to combine.
  6. Spoon in the zucchini boats. Place in oven and bake until golden brown on top, approximately 18-22 minutes (depending on oven).

Wednesday, July 1, 2015

Blueberry Tart (Galette)

Last summer, we found blueberries in our yard, after we had lived here for almost a whole year.  Yes, I know we are REAL observant.  Anyway, when my husband found our blueberry bushes, the birds had been having quite a feast, so I didn't really get to make anything last year, BUT this year has been different!  The blueberries have made it into pancakes, muffins and yesterday, for Father's Day, I decided to try my hand at a Blueberry Tart
from a recipe that I found online.  I changed it a little bit....OK, OK, I changed it a lot.  The original recipe calls for a homemade crust which I will confess that I didn't make.  I admit I cheated and bought the refrigerated pre-made roll out crust, but what can I say....I HATE to do dishes.  Well, this recipe was a HIT!  My husband acted as if I had gone out and purchased it from a Parisian bakery.  I do admit, it was pretty awesome, it might even had been better if I had made the crust homemade, but, yeah, that probably won't ever happen.  Enjoy this one!  It's a BEAUTY.....Literally!

Thursday, June 11, 2015

EASY BASIL PESTO!


This was the very first time I've ever made homemade pesto.  My husband planted some herbs for me this year and they have grown quite abundant.  Since he is not a farmer, I was a little skeptical but the Basil and Parsley are doing beautifully!  (Now the cucumbers are another story...)  So, with the fruits of his labor, I decided to try my hand at making some pesto.  I love the versatility of pesto, because it can be used for so much more than just pasta.  This recipe is a definite keeper!  Hope you love it too!


P.S.  I've also added at the bottom of this post, some other uses for the pesto besides using it on pasta.  Enjoy!

Ingredients
  1. ¼ cup walnuts OR ¼ cup pignoli (also known as pine nuts) * I use walnuts because they tend to be less expensive and the taste difference is minimal. Also, pignoli can be hard to find in certain areas.
  2. 1 ½ Tablespoons chopped garlic (I cheated and used the pre-minced kind in a jar – less work for me)
  3. 2 ½ cups fresh basil leaves, packed To clean basil, rinse really well in water and then dry VERY WELL.
  4. 1/8 teaspoon salt (If you want to use Kosher salt, that’s fine too, but I use the plain old table salt)
  5. ¾ cup Extra Virgin Olive Oil
  6. ½ cup Grated Parmesan Cheese (I used the Kraft Green Canister kind – you can also grate your own if you’re feeling like a Super Chef, but hey, that’s more dishes for me…so yep, I don’t)

Directions
1. Put the walnuts OR pignoli, and the garlic in the bowl of a food processor with the steel blade. Pulse about 30-45 seconds get a fine chop.
2. Add the basil leaves and salt.
3. With the processor running, SLOWLY pour the olive oil through the feed tube and process until the pesto is thoroughly pureed. Add the Parmesan cheese and puree for another 30 seconds or so.

*This can be used right away or you can store the pesto in the refrigerator or freezer. Keep in mind….If you choose to refrigerate or freeze for later, pour a thin layer of olive oil on top or it will get “YUCKY!”

MORE EASY WAYS TO USE YOUR PESTO 
1) Drizzle pesto over baked brie for a fancy appetizer your dinner guests will love. Serve with French bread and fancy crackers.
2) Replace Pizza Sauce -using pesto instead of the tomato based pizza sauce adds an entirely different layer of flavor to your homemade pizza. Just remember…. pesto is rich, so use it a bit more sparingly than you would the tomato based sauce.
3) Pesto French Bread-Instead of garlic bread, spread Butter Pesto onto crusty bread and bake in oven at 350 degrees Fahrenheit until lightly golden brown. Pesto Butter – 4 Tablespoons of softened butter and 1 teaspoon pesto. Mix well and spread on Bread. Makes 4-6 slices of bread. For more bread, recipe is easily doubled.
4) Spread on a Sandwich or Flatbread-Mix pesto with mayonnaise or use as is on sandwich bread or flatbread. Make a pesto schmear by mixing it with cream cheese and serving with bagels.
5) Make a Pesto Salad Dressing-Thinned with a little more oil and a splash of Red Wine Vinegar, and you’ve got a quick vinaigrette for summer salads. Whisk into buttermilk for an Italian version of ranch dressing.
6) Toss onto potatoes-Instead of butter, use a dab of pesto to garnish your potatoes
7) Smear on Bruschetta-A smear of pesto topped with a slice of mozzarella on a slice of baguette is one of our favorite quick appetizers.
8) Garnish a Soup
9) Use in Cheater Gourmet Tomato Soup – Recipe Below


*Cheater Gourmet Tomato Soup
1 can of Campbell’s Condensed Soup
1 can of Fire Roasted Diced Tomatoes
½ can of water (rinse out soup can)
1 teaspoon pesto in Soup
*Drizzle of Pesto on soup for serving.

**Serve with Pesto French Bread (Recipe Above)

Wednesday, October 30, 2013

Crock Pot Cheese Stuffed Meatballs

Hello blog world friends.  This recipe was submitted by my precious daughter-in-law, Silka.  She and my son are both full-time college students and take care of a busy 2 year old and they are both FABULOUS cooks.  They manage to take whatever is in the pantry and turn it into something amazing.  I though I would share this with you for those days when you want to enjoy a wonderful meal and not spend a lot of time in the kitchen.  Serve with a salad and some garlic bread.   YUM!  Hope you enjoy! 

Guest Blogger: Silka Manfredi
My husband and I are both full-time college students with a 2 yr. old, so time is extremely valuable to us. This often poses a problem when it comes to dinner time. Both of us love to cook, but with our schedules, there are a hundred more important things to do. I stumbled upon this crock pot recipe and thought it was just a great idea! It probably takes about 15 minutes of prep and about 10 minutes to brown the meatballs. Then, the rest of the work the crockpot takes care of!  (By the way, the recipe calls for fresh herbs, but I used dried because that was what I had on hand and it was GREAT!)

Crock Pot Cheese Stuffed Meatballs
Ingredients:
1 lb. ground beef (*may use only ground beef if you want)
1 lb. ground pork
4 grated parmesan cheese
1 to 1 1/2 cups Italian seasoned dry bread crumbs
3 large eggs
1 teaspoon salt
1/2 teaspoon freshly ground pepper
2 cloves garlic, finely minced
1 tablespoon fresh basil, finely chopped
1/4 cup fresh parsley, chopped
1/2 teaspoon dried oregano
4 oz. fresh mozzarella, divided into 12 pieces
3 tablespoons olive oil or vegetable oil
2 jars of your favorite red (Spaghetti/Marinara) sauce
2 pounds spaghetti, cooked al dente
*May substitute dried herbs and spices for fresh.

Directions:
1)  In a large mixing bowl combine ground beef, ground pork, parmesan, eggs, salt, pepper, garlic, basil, parsley and dried oregano.
2)   Add bread crumbs 1/2 cup at a time until mixture is not too wet and can be formed into balls easily.
3)  Form mixture into 12 balls using your thumb to press a hole in the center. Insert a piece of the fresh mozzarella into the hole and close the hole by pushing the meatball mixture around it to secure the mozzarella inside each ball. 
4)  Heat a large sauté pan over medium heat and drizzle olive oil into it. Add meatballs and cook until just browned.
5)  Using a slotted spoon, transfer meatballs into a slow cooker.   Pour red sauce over the meatballs and cook on LOW for approximately 5 hours. Serve the stuffed meatballs and sauce over spaghetti.
Servings: 6 (2 meatballs per person)
Prep Time: 30 min
Cook Time: 5 hours

Sunday, October 27, 2013

SCOTCH STEW - I think this may be sinful...but, oh so worth it!

As a new feature going into my second year of blogging, I will be featuring other amazing cooks from my family and friends. My first guest recipe contributor is my brother-in-law, Ron Hertz. He's an accomplished cook, hunter, husband, father and proud member of our military. I can vouch for his food, (as I've eaten it) and his German Pancakes are to DIE for!!! That recipe is also listed on this blog if you happen to want to make something amazing for breakfast.   Hope you enjoy his recipe!


By: Ron Hertz
This is a recipe I made up after watching a segment of the Today Show featuring Beef Burgundy. The Meat is wild game (usually elk) but sometimes I put lamb in it, depending on the individuals eating. The first time I made it, I didn't get a chance to try it, because the kids ate it all. When I went to get some, all that was left was the smell. So, the next weekend I made more and ate it all myself, (over a couple days of course).

RON'S SCOTCH STEW


Ingredients:
2 Lbs Beef, Lamb, or Goat (cut into cubes) 4 Medium Potatoes (cubed) 2 Stalks Celery ½ Cup Onion (chopped) ¾ Cup Carrot (chopped) 3 Cups Milk ½ Cup Flour Salt and Pepper ¼ Cup Olive Oil 2 Cups Scotch ½ Tbsp Each of Thyme, Basil and Coriander 1 Tbsp Season Salt
Directions:
Preheat oven to 350 degrees.
Put Flour and salt and pepper in a zip lock bag. Shake to mix. Add ¼ of the meat and shake until meat is covered. Repeat until all the meat is floured. In a soup pot, add the olive oil and bring to medium high heat. Put the meat in the hot oil to sear until lightly browned. Remove meat from soup pot and set aside. Reduce heat to medium and add scotch to make a rue, scraping the bottom of the pot until the bottom of the pot is clean. Add all the other ingredients and bring to a boil. Return meat to mix and stir. Cover stew and cook in oven for 1 hour and 20 minutes, stirring every 20 minutes. Remove stew and let stand for 10 minutes before eating.
Makes 3-4 servings.

Friday, October 4, 2013

Beauties and Blunders: Happy Birthday with L♥VE!

Beauties and Blunders: Happy Birthday with L♥VE!: Today I made a very special birthday cake for the love of my life...my husband.  This very special cake didn't require sifting the flo...

Happy Birthday with L♥VE!


Today I made a very special birthday cake for the love of my life...my husband.  This very special cake didn't require sifting the flour, folding in the flour in thirds, mixing wet ingredients with dry ingredients or 40 others steps....it has a very special ingredient.....LOVE!  You may think that this is not a true ingredient but I beg to differ.  A few years ago, when I actually started "liking" to cook, instead of cooking because we needed to eat, I noticed that my food came out better.  Even things that I had made lots of times the same old way, came out better.  What's the difference...I truly believe that I'm now cooking with LOVE!   This birthday cake is a plain old out of the box cake mix with canned frosting but I KNOW that it's going to taste amazing.  It doesn't have fancy piped frosting (I don't even own a pastry bag) but it does have a heart that I made from a paper cut out.   And you know what...my husband will love it just as much as if I had spent hours and hours in the kitchen.  So, here's to wishing you amazing dishes made with love!


Angela

Friday, September 6, 2013

Love, Marriage and Cap'n Crunch

Well, we have survived the move (barely) and I have actually started cooking again, after almost a month of eating out.  I never thought I would look forward to cooking, but there you have it....I do (at least until I can afford a personal chef).

Since my last post, my husband and I celebrated 22 years of marriage, and since we just celebrated our anniversary, I thought I would share the story of when I first fell in love with him.  It was over a bowl of cereal....yes, you read that right.  Not a romantic candlelight dinner but over a bowl of cereal (Cap'n Crunch Peanut Butter Cereal, to be exact).   Our story began at church, where we were both members of the same Sunday school class.  Somehow, we always managed to end up sitting next to each other during class and at class functions.  Soon, friendship turned into romantic interest and we started "dating".  I use that term loosely because our "dates" usually were renting a Disney movie and eating frozen pizza.  We also had a built in chaperon, my 4 year old son who loved to sit between the two of us on the couch as we watched the movie.  We had a lot of fun even if wasn't very romantic.  Steve (my husband to be) seemed to know very quickly, that I was the one he would marry and told me so but I wasn't so convinced after having come out of a disastrous marriage a couple of years before.  Anyway, one night, I had a business function that was going to run late and Steve (my husband to be) said that he and my son would just hang out and he could stay the night since I was going to be out so late for work.  My son was so excited about getting to sleep over, that he couldn't wait to get out the door and head to Steve's house.  When I called later that evening to check in with him and make sure everything was alright, my son exclaimed, "they were camping out in the living room, watching Teenage Mutant Ninja Turtles and having Cap'n Crunch Peanut Butter Cereal for supper!"  By the excitement in his voice, you would have thought it was Christmas morning and I knew right then and there, that Steve was the one.  My heart took a tumble and landed at the feet of the man that made my son so happy.  His name is Steve and he is my very own Prince Charming.  And as the story goes.....we have lived happily ever after.

In honor of that very special food...Cap'n Crunch Peanut Butter Cereal, here is a fun recipe for you to try.

Peanut Butter Cereal Treats 
Credit for Recipe and Photo to "Taste of Home"
Originally published as Peanut Butter Cereal Treats in Simple & Delicious May/June 2007, p56

Ingredients

  • 30 large marshmallows
  • 3 tablespoons butter
  • 1 tablespoon Jif ® Creamy Peanut Butter
  • 6 cups Peanut Butter Cap'n Crunch
  • 1-1/2 cups milk chocolate M&M's

Directions


  • In a large saucepan, combine the marshmallows, butter and peanut butter. Cook and stir over medium-low heat until melted. Remove from the heat. Stir in the cereal and M&M's.
  • Pat into a 13-in. x 9-in. pan coated with cooking spray. Cool. Cut into bars. Yield: 2 dozen.

Thursday, August 8, 2013

Breaded Steak Fingers

Well, this will be my last blog post before we move into our new home.  I have been preparing SUPER EASY meals the last few weeks because I am just too tired after packing to mess with a meal that requires too much thought and preparation.  Of course, that is me most of the time, but the packing gives me a real excuse....right?  With that being said, I tried out something new and these were amazing!  They don't require hardly any fuss and cook up in minutes.  I am very fortunate to have an AWESOME meat company (Stone's Meats) close to me where I can call in and order special cuts and it's all ready for me to pick up for dinner.    I ordered some steak that was cubed and pre-cut into strips which saved me from having to do it.  Then, I breaded it and fried it up and served it with some french fries (I will admit that I used frozen fries, but, hey, they're so good!).  Great dinner and so easy!  Here's the recipe!  Enjoy!

Breaded Steak Fingers
Ingredients
1 lb of cubed steak cut into strips
1 cup of flour
2 teaspoons salt
1/2 teaspoon pepper (optional - if you don't like pepper, then just omit this)
1 teaspoon garlic powder
1 bowl of water to dip strips in

Directions

  1. Heat cooking oil to 375 degrees Fahrenheit in a skillet or use a deep fryer (I use a deep fryer).
  2. Mix all dry ingredients well in a dish.
  3. Dip steak in water to moisten and then dip into flour mixture making sure it's coated really well.
  4. Fry until golden brown, which is about 4-5 minutes.  Remove and place on plate lined with paper towel to drain any extra grease.  Serve immediately.  Horseradish dipping sauce is wonderful with this and of course the old standby, Ranch dressing is good too!
  5. Add some fries, mashed potatoes or rice and you have a great dinner!


Thursday, July 25, 2013

Frozen Lemonade Pie - Blooper Alert!

You know the old saying, "When life gives you lemons, make lemonade," well, I decided to make Lemonade Pie.  As I have been packing every day for what seems like forever, I have been sorting through things to keep, sell or give away.  I had the sad job of downsizing my cookbook collection. Realistically, I don't use all of them, but it's sure hard to let them go.  I am hoping they find a new home and will bring their new owner much joy.  Anyway, I digress.  I found this recipe for a Lemonade Pie in one of my trusty recipe books that is sort of my "no fail" recipe book when I am looking for something new to make.   It seemed easy and sounded good (my top two requirements in a recipe).  So, I bought the ingredients for the pie, and then promptly forgot all about them (until AFTER I packed my trusty recipe book).  I don't know what I was thinking.  Obviously, I wasn't, thinking that is.  As I opened my freezer a couple of days ago, looking for something to make for dinner, I noticed the Lemonade and Cool Whip and remembered that I wanted to make that pie.  Since I had packed my trusty recipe book, I decided to try a recipe off the internet and got down to it.  The recipe was called "No Fail Freezer Lemonade Pie."   Guess what!  It failed, sort of.  The pie tasted good but it never froze.  It kind of had the consistency of soft serve ice cream.  Not sure what happened....I followed the recipe exactly but I have to admit that I made a blooper this time. Hey! Maybe I can blame it on the freezer.  Sounds good to me!   Until next time.....if life gives me lemons, maybe I'll stick with plain old lemonade.


Tuesday, July 9, 2013

Cheesy Crescent Rolls - YUM!!!


My life is a little chaotic at the moment.  Alright, who am I kidding?  It's EXTREMELY chaotic right now.  We are in the process of moving to a smaller house after living in our current home for 14 years.  I cannot believe how much "stuff" we've accumulated.  Now, it's the time for sorting and packing up the things we're keeping (and will fit in our smaller home) and donating the things that we no longer need.  This is not always an easy process, especially for my husband who is a PACK RAT!  I admit that I save sentimental things but he has stuff from his college days like shirts he wore two sizes and twenty years ago.  We have shared a lot of laughter and the occasional tears, sometimes both at the same time as we get ready to start a new chapter in our lives.  Anyway, in the midst of all this chaos and boxes, we still need to eat.  So the next few weeks I will be posting about quick and super easy RECIPES that don't require a lot of fuss and preparation but you and your family will still enjoy.

These crescent rolls are amazing and oh so easy (my favorite kind of recipe)!  The best part is that these rolls are very versatile.  They're great for breakfast with just the cheese, you can also add a thin slice of turkey or ham along with the cheese and it's a great lunch to take on the run.  Another way to serve them is to cut the triangles in half and you've got a great appetizer. If you're feeling a little decadent, you can put a little piece of chocolate (hershey's kiss or a small spoonful of Nutella) in the middle and roll up.  It's like sin on a plate.  So many ways to enjoy them!

Cheesy Crescent Rolls
1 package of refrigerated crescent rolls
Approximately 1/4 cup of shredded cheddar cheese

Directions:
Unroll crescent roll and separate into individual triangles. Place on baking sheet. Put 1 tablespoon of shredded cheddar cheese on each crescent roll and roll up.  Bake according to directions on can.  It's that easy.


*Variations - You can add a thin single slice of turkey or ham (like the deli sliced lunch meat) that has been cut to fit the crescent roll (about 1 inch X 2 1/4 inches).  I do not suggest putting more than one slice of meat along with the cheese.  The rolls tend to come out gooey and don't cook evenly.  I have made them with the one slice of meat and cheese and they're great.  My daughter loves to take them for lunches or even a quick breakfast to go.


Wednesday, June 26, 2013

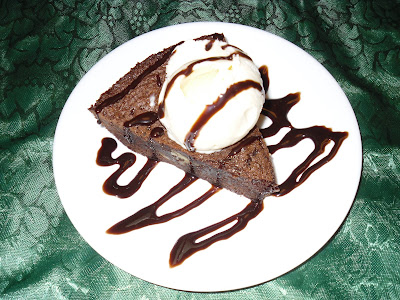
Fudge Brownie Pie also known as Ireland's Killarney Pie

When I was in college (waaaayyyyy back in the dark ages) back in Nashville, Tennessee, my friends and I would occasionally get a chance to eat out at a little restaurant called Ireland's.  Supposedly Ireland's served Irish pub food, hence the name Ireland's.  Since I've never been to Ireland, I can't attest to that fact.  I can, however, say that their food was simple and delicious and even a poor college student could afford it occasionally.  My two favorite things from their menu were the steak and biscuits and their Killarney Pie.  I have tried many times over the years to come up with the recipe for their steak and biscuits.  The biscuits were airy and light and the steak melted in your mouth like butter.  I haven't succeeded as of yet, but I'm not giving up.   If I succeed, that will be a future post.   As for the Killarney Pie (which should've been named "Sin On A Plate", because it's that good), this recipe tastes exactly the same as what I had way back when, in the good 'ole college days.  Of course, that was, never mind how many years ago, but my taste buds remember a good thing.  Hope you love it as much as I did!  

Killarney Pie
Ingredients:
6 Tablespoons Cocoa
½ cup of Self-Rising Flour
1 cup sugar
2 eggs
1 Tablespoon Vanilla
1 stick of melted butter
½ cup of chopped pecans OR walnuts

Directions:

Preheat oven to 325 degrees Fahrenheit.  Spray pie dish with non-stick cooking spray . Mix all ingredients (except nuts) together in bowl, until smooth, add in nuts and stir just until mixed.  Pour into pie dish and bake for about 30 minutes.   Knife inserted into center should come out clean.    This pie is best served warm with vanilla ice cream and drizzled with chocolate syrup (like Hershey’s).


Saturday, June 15, 2013

Parmesan Ranch Chicken

I was born and raised in the South and have been surrounded by AMAZING cooks all of my life.  My mom was an amazing cook.  My grandmother was better than my mom and that's saying a lot!  All of my Aunts are amazing cooks, my sisters are phenomenal in the kitchen and then there's me.   They all made cooking seem effortless.  My mom NEVER had "bloopers or blunders."   She worked all day, then would have a fantastic meal on the table and she never seemed to think too much about it.   Now, my Mom grew up during the depression and was married and cooking for a family in the 1940's.   Food during WWII, was not always plentiful and certain items like sugar and flour was even rationed.   Maybe that's how she got to be so creative in the kitchen.  It's like that old saying, "Necessity is the mother of invention."  Anyway, the one thing that I remember most about my mom's cooking, is that she was never afraid to try something new in the kitchen.  She would just "throw" stuff together and it would turn out like something from a 5 star restaurant.  As I have started being more adventurous with recipes, I am learning to take more chances.  This recipe is something that I came up with based on a garlic bread recipe that I make that is melt in your mouth delicious.  So, I decided to take a walk on the wild side and my family said it was THE BEST chicken they had ever eaten.  Since I have a VERY PICKY teenage daughter, that was the highest praise.  It is very flavorful and very moist, which can be a problem with boneless/skinless breasts.  It's sure to be a winner in your family too!  Hope you enjoy it!

Parmesan Ranch Chicken


Parmesan Ranch Chicken
*This recipe will make enough for 4 chicken breasts

Ingredients:
Boneless and Skinless Chicken Breasts 
1/2 cup mayonnaise
1 Tablespoon dry Ranch dressing mix (If you are using bottled ranch dressing, decrease mayonnaise to 1/4 cup and 1/4 cup bottled ranch dressing)
Grated Parmesan Cheese to sprinkle on top of mayonnaise mixture (about 2 Tablespoons)

Directions:
Preheat oven to 350 degrees Fahrenheit.  Place chicken breasts in baking dish.  (I lined mine with aluminum foil for easy clean up).   Mix mayonnaise and ranch dressing together.  Brush on chicken breast with pastry brush coating really  well.  Sprinkle Parmesan cheese over top of mixture.  Bake at 350 degrees for about 30-40 minutes (depending on the size of your chicken breasts).  Cook until juices run clear when chicken is pierced with a fork or if using a meat/poultry thermometer (like the one below), until internal temperature is 165 degrees Fahrenheit.


Friday, May 31, 2013

Sweet Summer Strawberry Sorbet

Summer temperatures are here!  Of course, in Florida we can have summer temperatures in winter but that's beside the point.  Summer brings sunny skies, lazy days by the pool (or in our case redneck water slides) and foods that don't require lots of preparation time (WOO HOO!)  I don't cook nearly as much in the summer because I HATE to be hot!  Anyway, we tend to eat a lot more fresh fruit, vegetables and salads in the summertime because everything tastes better when it's in season.  This recipe is AMAZING and the best part is that it's super simple.  Hope you enjoy!

Strawberry Sorbet

Ingredients:
1 pound of Fresh or Frozen Strawberries (If using fresh, make sure to wash and hull)
1/2 cup of sugar (you can use a little more if you like, taste after blending)
1/4 cup of water
1 teaspoon lemon juice

Directions:

Put all ingredients in blender and pulse until liquefied.   Do a taste test at this point, you can add a little sugar if you would like it sweeter.  Pour mixture into ice cream freezer (like the one below), turn on and let the freezer do all the work.  Takes approximately 30-45 minutes to freeze.  When ready, pour into dish and place in freezer to completely set (about 2 hours).  Makes approximately 6 servings.


Saturday, May 25, 2013

Freedom Isn't Free

Most of us spend Memorial Day by getting together with friends, grilling and watching parades.  The high school band playing patriotic tunes while young children wave their flags.  Young men in uniform and older veterans, both marching proud and tall, snap their salutes to the crowds as they go by.  As the living march to pay tribute to their fallen comrades, we must remember that this day is to pay honor to all of our servicemen and women who have given their all to preserve the freedoms that so many of us take for granted.

To those who have paid the ultimate price, by laying down their life, words will never be enough to say thank you.   For the gift of our freedom, we honor our dead by celebrating, living free from tyranny, bought with another's sweat, tears and blood.
No, Freedom Isn't Free
©Copyright 1981 by CDR Kelly Strong, USCG (Ret).

I watched the flag pass by one day.
It fluttered in the breeze.
A young Marine saluted it,
And then he stood at ease.
I looked at him in uniform
So young, so tall, so proud,
With hair cut square and eyes alert
He'd stand out in any crowd.
I thought how many men like him
Had fallen through the years.
How many died on foreign soil?
How many mothers' tears?
How many pilots' planes shot down?
How many died at sea?
How many foxholes were soldiers' graves?
No, freedom isn't free.

I heard the sound of taps one night,
When everything was still
I listened to the bugler play
And felt a sudden chill.
I wondered just how many times
That taps had meant "Amen,"
When a flag had draped a coffin
Of a brother or a friend.
I thought of all the children,
Of the mothers and the wives,
Of fathers, sons and husbands
With interrupted lives.
I thought about a graveyard
At the bottom of the sea
Of unmarked graves in Arlington.
No, freedom isn't free.

Tuesday, May 21, 2013

Creamy Chicken Casserole


This casserole is super easy and blunder free (which is ALWAYS a plus in my cookbook).  I happened to make this particular casserole last Friday for our "Family Fun" night.  I had some leftovers I needed to use and I didn't really feel like cooking another big meal.  I wanted to concentrate on the all important task of relaxing.   Hope you enjoy this recipe and a night of relaxing too!

Ingredients:
1 can Cream of Celery/Mushroom/Chicken Soup
1 cooked chicken breast (shredded)
1 8 oz container sour cream
3/4 cup milk
2 cups shredded cheddar cheese
8 oz. of cooked noodles (whichever you prefer)  I had leftover spaghetti noodles and that's what I used but any kind of noodle works (Ziti, Spaghetti, Fettuccine, etc.)

Directions:
Preheat oven to 350 degrees Fahrenheit.  Spray baking dish with non-stick cooking spray.  Place cooked noodles in layer In a large bowls mix soup, sour cream and milk.  Mix well.  Add in shredded chicken.  Stir well and pour mixture over noodles.  Bake for 25 minutes until heated and bubbling.  Top with shredded cheese and cook for another 8-10 minutes until cheese is melted.  Remove from oven and let cool for about 10 minutes before serving.


Sunday, May 12, 2013

Mother's Day Blessings

As I sit here and ponder on the joys of motherhood, I wanted to share a little about what being a Mom means to me.  

I have held many job titles over the course of my life, but I can honestly say that being a Mom is by far and away the most important job I've ever held.  As a nurse, I was responsible for caring for the life of others and even though I have dressed many wounds in my nursing career, none meant more to me than taking care of the scraped knee of my child and kissing that scraped knee to make it all better.  I have taken care of a young man dying with AIDS and sat holding his hand because his friends were to scared to sit with him.  I've comforted the family who was left behind when a beloved Grandmother passed away.  I have performed CPR on a victim of a heart attack and shed tears and gave a prayer of thanks to my Lord above when he started breathing.  I cannot count the numbers of patients who have touched my life in some special way.  Yet, all of that pales in comparison to being a Mom.  My proudest moments were when two precious children were entrusted to me to love and care for.  My son, (oh, how I love saying those words) is 27 years old and working hard on earning his Bachelors degree.  He is a wonderful father to my only grandchild and a loving husband and is the best son that a Mother could ask for.  My 17 year old daughter is my second blessing and brings much laughter and joy into our home.  She is a dancer and a theatre student, which is very appropriate, since she has been a drama queen from the time she was born.   Even though they're too old for me to kiss their "boo-boo's",  or need me to hold their hand, they will hold my heart forever.

It is traditional to give a special gift of recognition on Mother's Day to show appreciation.  I can honestly say that out of all the gifts I have ever received or hope to receive in the future, that the most amazing one is being a Mom.  I hope all of the Moms out there have a blessed and joyous Mother's Day.   Treasure the time with your children, love them and teach them to fly.

Thursday, May 9, 2013

Veggie Pizza - YUM!!!!


This week my husband and I were invited over to my niece's house to play cards.  We love to get together and play cards with our friends especially when the good guys win (that would be me and whoever my partner is for the game).   Unfortunately, that was not the case a few days ago.  We got soundly beat.  I'm not sure how it happened, but I'm blaming it on my niece.  That's what family is for....Right?  
Anyway, for our little get together, she wanted me to bring something.  She wouldn't tell me what she wanted me to bring, just to bring something that goes with everything.  I thought and thought and thunk some more (yes, I know that's not a real word but I like it...it's fun to say) and decided on a veggie pizza.  This pizza is soooo good and it works as an appetizer (just cut it into smaller pieces) or as a meal.  You don't even need a salad because all the veggies are already on it.  It's a real winner, unlike my niece and I playing cards the other night. Enjoy:)

Veggie Pizza
Ingredients:
2 packages of refrigerated crescent rolls
1 package (8 ounces) cream cheese OR  Neufchatel cheese softened  to room temperature (*the Neufchatel cheese has 1/3 less fat and tastes just as good),
1 Tablespoon mayonnaise
1/4 teaspoon garlic powder        
1 teaspoon dried dill
1/8 teaspoon salt
1 ½ cups of shredded cheese (I prefer a mix of cheddar and mozzarella, but you can use whatever you like)
2  cups assorted fresh vegetables such as broccoli, cauliflower, cucumber, green or red bell pepper, tomato, green onions, mushrooms, carrot, zucchini or yellow summer squash

Directions:
1)      Preheat oven to 350°F. Unroll crescent dough onto a large baking sheet and seal seams (doesn’t have to be perfect).   Bake 12-15 minutes or until light golden brown.  Remove from oven and let cool completely.
2)      In a bowl, combine cream cheese, mayonnaise, garlic powder, salt and dill weed.   Spread cream cheese mixture evenly over crust.
3)      Prepare your assorted vegetables.  (I used red bell pepper, zucchini, cherry tomatoes, yellow squash and broccoli). Sprinkle vegetables over pizza.   Sprinkle shredded cheese on top and return to oven just long enough for cheese to melt (about 5-8 minutes).  Let cool slightly before serving.  This dish is wonderful served at room temperature also which makes it great for parties.  Enjoy!


Monday, April 29, 2013

GREAT IDEA!!! HOMEMADE COFFEE CREAMER

Collin @ Hip2Save.com
Hi all!  I wanted to share this great idea that I came across today on one of my favorite websites, Hip2Save.com  Collin shares great tips and savings ideas for everything from coupons to online deals and everything in between.   This video shows how to make homemade creamer and takes only two ingredients, yes, you read that right, two.  Even I can't mess that up!   (The Hallelujah Chorus should be playing right now).  The best thing is that you can make your very own specialized creamers once you have the base.  I can think of seasonal creamers (like Autumn spice made with pumpkin pie spice and caramel topping or maybe Peppermint at Christmas).  The possibilities are endless!  Hope you guys love this idea as much as I did!     Let me hear from you if you decide to try this.  I would love to know what your favorite combinations are!

A very special thank you to Collin at Hip2Save.com for allowing me to share her brilliant idea and "how to" video!


Wednesday, April 24, 2013

Do NOT try this at home! BLUNDER ALERT!

Well, I knew it was too good to be true.  I haven't had any blunders for quite a while and I went and opened my big mouth and said the same to my husband the other day.  Sure enough, I made a doozy!  I was craving a cheeseburger and therefore decided to try and modify a quiche recipe that I have made DOZENS of time into a cheeseburger quiche.  I was so excited when I took it out of the oven because it looked and smelled amazing.  Suffice it to say, you can't judge a book by its cover or in this case the taste by the look.  After letting it cool for a little bit, I took a nice big bite.  Let me just say.....eeeewwwww.....GROSS!!!!  My beautiful quiche experiment ended up down the garbage disposal.  Not sure what went wrong except for the fact that I will absolutely, under no circumstances, be saying that I haven't had any blunders recently.  Obviously, that's a sure-fire way for me to have one.  Oh well, hope you all get to enjoy the laugh with me :)